Showing posts with label sustainability. Show all posts

Thursday, 7 March 2013

making a self-watering container from recycled material

I'm forgetful when it comes to watering plants in containers. Pets are easier, they ask for food when they get hungry. Plants don't, and untill they do, this is a great way to keep them alive, even when you are not in the opportunity to keep an eye on them.
It takes almost nothing too.
needed: empty can, 3 small screws, device to poke holes in your can ,
piece of string (from a mop) as a wick, a hammer or  a drill 

screw 3 screws halfway in the outside of your can to support the lid and
connect the string in the lid

should look something like this

insert the lid in the can, let it rest on the screws

finished! water goes in the bottom, soil goes in the top. add your seeds and see them grow.

Monday, 20 August 2012

my stand with weed recipes at museum Oud Overschie

museum Oud Overschie has beautiful gardens where we had a little market for de groene loper event. It was a wonderful hot day and I prepared some weed pesto's, with comfrey and elder, and made rocket pancakes for people to taste. For drinks we had elderblossom sirup and rosehip sirup. I also prepared some thymesirup, very nice stuff for a sore throat.
The recipes could be taken home to try it for yourself. It's nice to be able to use the weeds that grow in your garden.  


Sunday, 3 June 2012

Stevia

We've been using liquid stevia instead of sugar for some time now, and when I had the chance to plant stevia in my garden I didn't hesitate. Now the next thing was to learn to make the extract. Found and will test this recipe as soon as our plant is ready to harvest. 

Place your crushed (dried) stevia leaves in a glass jar, then pour vodka over them to coat. We are using vodka instead of water to extract the glycosides because we’ll get a much sweeter end result this way. Opt for vodka over other liquors because it’s flavorless and cheap.
Put the lid on your jar, shake it up, and let it sit on your counter for 24-36 hours. Don’t let it sit for longer than 36 hours, as it will turn more bitter. I used to make a liquid stevia extract the same way that I made other herbal tinctures, letting it sit for weeks. While this may improve the medicinal quality of the extract, it sacrificed a lot of sweetness to do it.
Next, filter out the leaves. 

Sunday, 13 May 2012

dandelion marmalade


pick and wash dandelions,
remove stems and most green parts from the flower

put heads of dandelions in pan
with the juice and gratings of 1 orange and 1 lemon
add 200 grams of sugar, boil 30 minutes to dissolve sugar

put in well cleaned jars while still hot

nettle pesto

pick young nettle leaves

fry lightly in olive oil with one small onion

put in blender with olive oil and clove of garlic and blend,
add grated grano padano cheese and roasted and crushed
pine nuts, pepper and salt to taste 

P(r)esto!

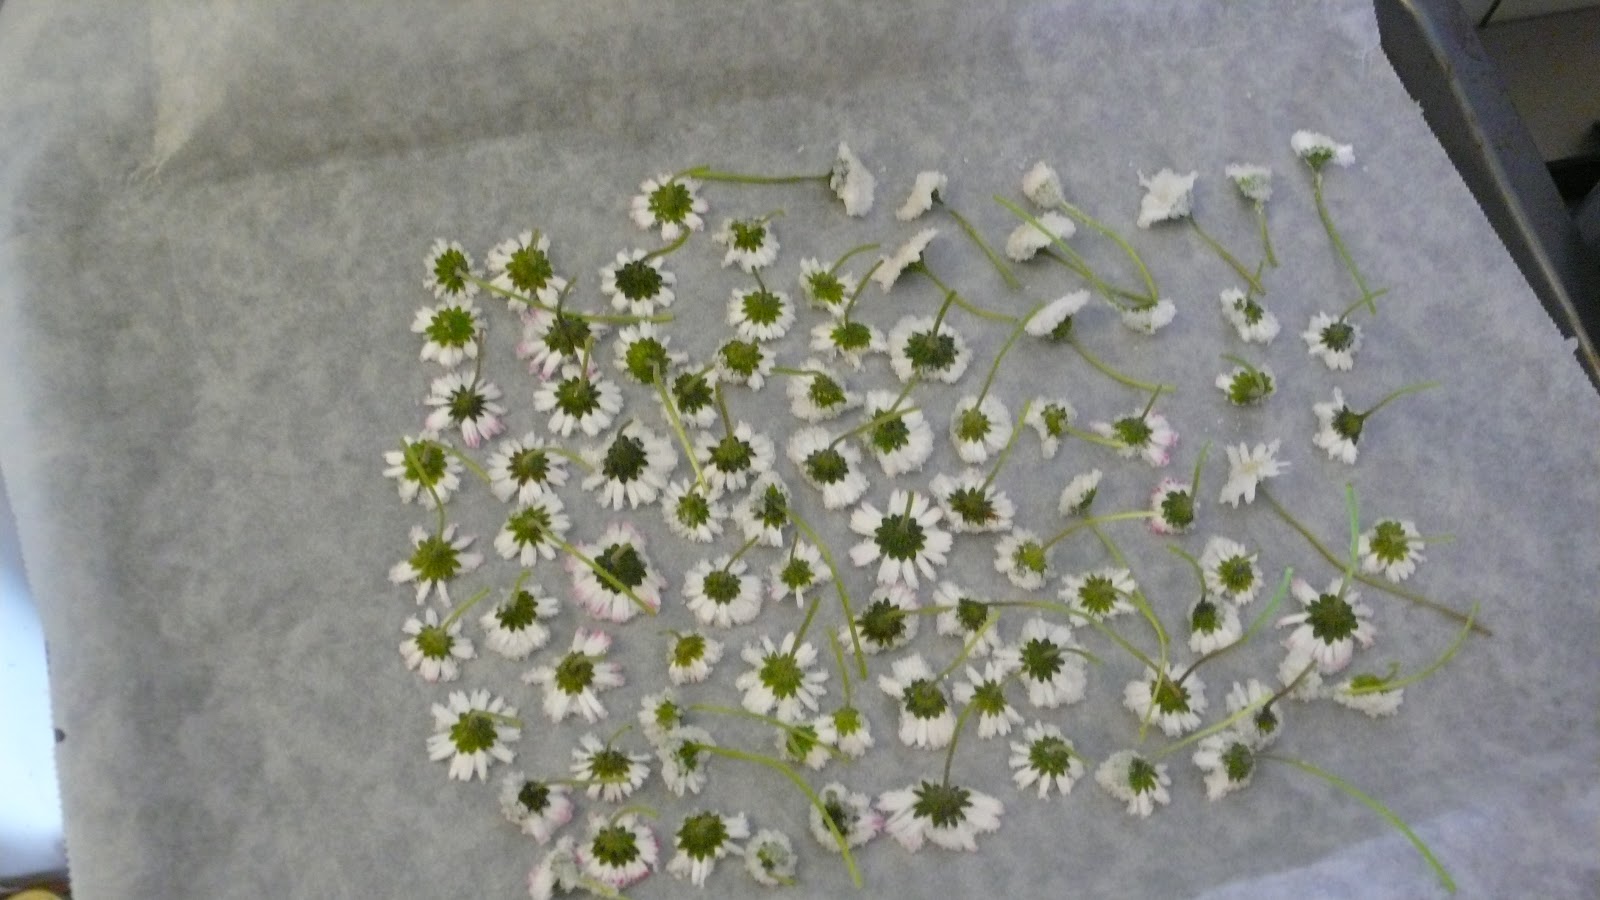
pretty sugar daisies


pick daisies and wash


pat dry
pick up daisie and spread leafs,
dip in whipped eggwhite, then in sugar


put upsidedown on a baking sheet


put 10 minutes in oven
on the absolute lowest setting (50 degrees C)

pretty sugar daisies
to eat as candy or decorate cookies or cake

Tuesday, 27 March 2012

Elderflower champagne


Spring has really started now, and in a month or so it will be  elderberry blossoms  time! You can find   Elder-flower in a lot of places along the side of the road, they are very fast growers and give lots of flowers that produce a fresh smell that you can bottle as a syrup and even turn into Elder-flower champagne with a very little bit of alcohol.


Elderflower champagne

Pick enough elder-flowers to fill a 5 liter pan or bucket, and add 5 liter water and 500 gr. sugar, a handful of raisins and a whole lemon in pieces. Do not rinse the flowers beforehand, this will leave less flavor. The more pollen the flowers have the better the taste. 
Cover bucket with cloth and set aside for a few days, stirring occasionally.

After a few days the fermentation process will have started. Pour the mixture through a sieve into bottles, that you first cleaned and rinsed with soda in hot water. (the caps or corks as well)

After a few days open a bottle to check if the fermentation process already made the champagne bubble. You want just a little fizz, set it aside again. If it's a lot, open all your bottles. Release some pressure to keep it safe...  

Sunday, 25 March 2012

elderflower sirup


Spring has really started now, and in a month or so it will be  elderberry blossoms  time! You can find   Elder-flower in a lot of places along the side of the road, they are very fast growers and give lots of flowers that produce a fresh smell that you can bottle as a syrup and even turn into Elder-flower champagne with a very little bit of alcohol.

To make syrup pick about 20 (or more!) elderberry blossoms when they are open and full of pollen and put in a bucket with enough water to keep them fully submerged. I usually put a plate on top to keep them under water. 
Add a sliced lemon to the water and leave for a night and a day. 
Then pour through a sieve into a pan and add a generous amount of sugar, at least about 500 gr. per liter. The sugar will make the syrup sweet but also conserve it, so don't try to be healthy and use too little. You will need less syrup when you use enough sugar to make it.
Cook the mixture to allow the sugar to dissolve fully. 

In the meantime sterilize enough empty and rinsed (wine)bottles by submerging them in a sink filled with very hot water with soda. Always do this, even when you are using new bottles, to make sure your syrup will keep and not become moldy...   

Pour the hot syrup in the bottles, using a funnel (also sterilized in the hot soda-water) 
Close bottles and set aside for later use. After opening a bottle keep refrigerated.
Pour some cold water in the pan that you used for cooking and drink your first syrup immediately, it has a very delicate and good taste! 

Sunday, 3 October 2010

rosehip experiments

after cooking the rosehips i blended them to pulp and found
the seeds floating on top of the mixture.
first used a skimmer and then diluted the pulp
with water to pass it through the sieve better.


the sieved rosehips
lots of messy work!

sterilizing the jars with hot water and soda and filling with
hot mixture of rosehips, 1 apple, lemonjuice and sugar.

Saturday, 2 October 2010

hunting and gathering

after picking rose hips we found large fields of chervil under the trees, and picked a bundle to make soup that we ate when we got home.
start by frying an onion in olive oil and add the chopped chervil, stir fry for a minute and add water and broth. chop with a hand blender and serve... we added a little bit of creamed coconut on our plates, it was a lovely soup!

Friday, 1 October 2010

hunting and gathering

today i went to the beach with my friend Marjan and her daughter to pick rose hips in the dunes. it was a lovely sunny day and we picked a lot! i am going to try and make rose hip jam with them for the first time in my life. at this moment the rose hips are soaking in a large tub of water with a bit of salt in it, to try and get every creepy crawly thing out of them (that will be the only hunting i am doing i must admit, the rest was only gathering), tomorrow i will be cleaning and boiling away... hope it all works out, did i already say i never did this before :-)


Thursday, 30 September 2010

making a worm compost bin


today I made a compost bin from plastic containers after i saw this method a few weeks ago at the oogstfestival 

you have to drill a lot of holes, big ones, with the largest drill i had, in all the containers except the bottom one.this one is for the fluid that is produced in the proces of composting. 
the container right above it is where you put your worms and vegetable waste that is a few weeks old, and the container on top of that, and more containers if you need them, are for your fresh fruit and vegetable waste. when the worms are done eating in the lowest container they will move up to the next one and start eating there. at this time you can remove the eaten container and use the very fertile compost in it for your plants. the water that drips to the bottom container can be used to water plants and is also full of nutrients.

composting this way can be done smell free indoors. 

first a whole lot of holedrilling, and one very hot drill and two empty batteries later:
cleaning the holes with a small knife,
and last: putting a piece of paper on top with what may be put inside: 
fruit and vegetable waste, coffee and tea, dead flowers, eggshells,
but no bread and cooked food, meat, fish or dairy products. 
next step: dig up some worms in the garden or go to the fishing store and buy some to start composting.


Wednesday, 15 September 2010

vintage finds yesterday


after a productive day where I sent out a new project plan and went to have my sore shoulder x-rayed I rewarded myself with a trip to my favorite thrift store, and found a stash of well organised vintage buttons, some old office-stamps that i am going to re-use as fabric stamps and a beautiful black bag from the same line as the green bag I am currently using.  

Monday, 25 January 2010

Fred & Wilma in de Vinexwijk - maak van je huis een zelfvoorzienend paradijs -


finished my meeting today, walked back to Amsterdam Central Station, passed some nice shops and bought an interesting book on the way. it combines old methods and new inventions for living sustainable yet fashionable combined with living in a modern city. lots of tips how to do things like make cheese, filter water, heat your house, brew your own beer, live slower and more connected. living this way simplifies your life, as it is cheaper and you don't have to work too hard to earn money to buy stuff you can make yourself.
like it!

Wednesday, 20 January 2010

can't wait till spring...


Okay, I don't really need this, since I have the luxury of having a garden but I love the idea of growing your own food in your window, plus it is about as easy to keep as your average farmville farm. After installing the system it's selfsufficient, so all you have to do is harvest when your food is ready. Don't even need the neighbours to water your plants when you go on holidays...
http://www.youtube.com/watch?v=2fPZWJggyXY

can't wait till spring...


this man grows his tomatoes upsidedown.
http://www.youtube.com/watch?v=by0ttwUmvdw
Related Posts Plugin for WordPress, Blogger...